Picking List
Any physical retrieval of inventories must be performed under this module in the Chronos eStockCard Inventory Software. Picking List can be prepared by either in Auto Conversion mode or Manual mode.
a) Auto Conversion Mode
Step 1 Launch Sales Order module.
Step 2 Click “Search By” button and select the appropriate Sales Order number from the listing. Be reminded that only confirmed sales order will be listed. The confirmed Sales Order has been retrieved and displayed as below. ( Fig 1 )

(Fig 1 )
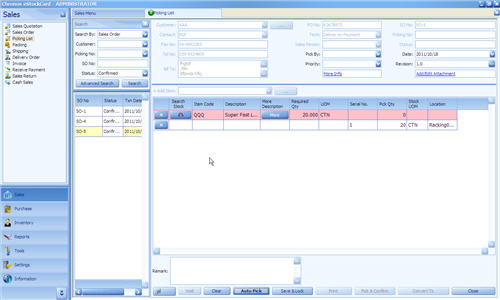
Step 3 Click the “Convert To” button and select “Picking”. System will automatically copy common data from Sales Order to Picking List. ( Fig 2 )

(Fig 2 )
b) Manual Mode
Please click “Picking List” at Sales Module right away and you will see this with blank content. ( Fig 3 )

( Fig 3 )
Entering Data
Step 1 Click “Search By” and select “Sales Order”. Follow by click “Customer” and the pull down menu will display all the customer lists, please select one customer only. Only confirmed sales order can be processed. System will automatically retrieve some common information as displayed below. ( Fig 4 )

( Fig 4 )
After the Picking List has been prepared, you are yet to perform the retrieval process. You can retrieve the inventories either “Auto Search” or “Manual Search”.
i ) Auto Search
When user click “Auto Pick” button, system will suggest the best locations based on predefined logic such as FIFO (First-in-first-out). You will see the following after “Auto Pick” is clicked. ( Fig 5 )
( Fig 5 )
There is an additional row (in white color) just right below every line and that is the location ID that suggested by the system.
ii) Manual Search
Click “Search Stock” button, and the system will list all the item = QQQ and its corresponding location ID for manual selection ( Fig 6 )

( Fig 6 )
User will require ticking the “Check” box and amending the “Required Qty”, be reminded that user are not allowed to retrieve excess quantity that entered at the Sales Order. Click “OK” and return to the main screen of Picking List (Fig 7)

( Fig 7 )
Step 2 Enter “Pick By” and “Priority”. These are optional fields for future reference.
Step 3 Click “Save & Lock” to lock the location ID in order to reserve the item and quantity. A new Picking List number to be generated and the status of the Picking List have been set as “Active”. User still can amend as long as this Picking List has not been confirmed (Fig 8 )

( Fig 8 )
Step 4 Click “Pick & Confirm” if there is NO more modification and amendment. Be reminded that this is a non reversible process and actual retrieval of the inventories will be performed after the “Pick & Confirm” button has been clicked ( Fig 9 )

( Fig 9 )
Step 5 User can print the Picking List and deliver to the shop floor operator to pick the items. Click “Print” and system will display “Print Options”, select “Print List” ( Fig 10 )

( Fig 10 )
Step 6 Print barcode. User can print the barcode label after the items have been retrieved. However, you need to define barcode format and content at Tools > Label.