LOCATION MASTER MAINTENANCE
You are advised to plan, organize your storage locations properly and thoroughly. Several issues must be taken into consideration: -
- Number of storage locations
- Arrangement
- Restricted Area (also called Fixed Area) for certain items which may sensitive to certain environmental factors such asdirect expose to sunlight, humidity, free from contamination.
After you have done so, we need to assign unique location ID (location code) to every storage location, this process is called “Naming”. It is similar to every house should be assigned with specific address for proper identification purpose.
Default Configuration
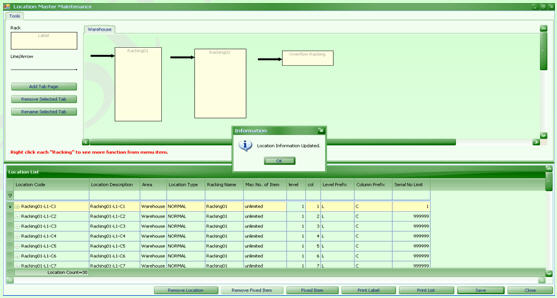
Path: Settings > Location
If you launch Settings > Location, you will see the following screen which consists of two portions (Fig. 1):
- Drawing Canvas - Allow you to add, delete or edit logical mapping
- Location List - Every location address (Location Code) and its properties.
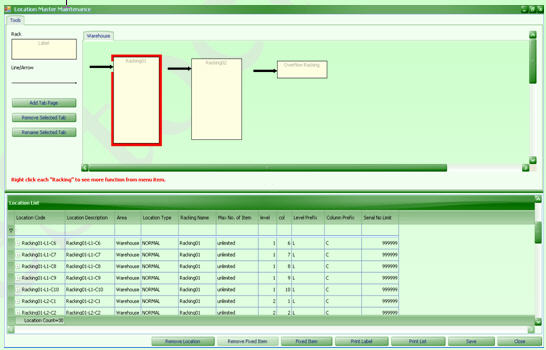
( Fig. 1 )
The default setting of storage locations are having the following properties and attributes:-
- There are two types of locations, i.e. Normal & Overflow
- Normal storage locations have its unique location code and properties :-
- Number of racks = 2. (with prefix = Racking01, Racking02)
- Each rack has 3 layers. (with prefix = L)
- Each layer has 10 columns. (with prefix = C)
- Total number of unique location code = 60.
- Every unique location code has defaulted to the following properties :-
a) Multiple and different items can be mixed. (default value = unlimited) You can store more than one type of item in this location code with NO limit.
b) Serial Nos Limit (default value = 999,999)
For examples,if you required 5 cartons of Coca-Cola can be stored into this location with 5 different serial numbers, then just enter 5 at the Serial Nos column.
And for only 1 cartons of Coca-Cola can be stored at the respective location, just enter 1 into it.
For info,the serial number will be auto-generated by the system during IN operation.
- Overflow storagelocation refer to those temporary storage areas. The location code is defaulted to = Overflow Racking-L1-C1. By default, you are allowed to store unlimited item as well as serial number.
- In total, there are 61 unique location codes inclusive of overflow area.
Modification
Path: Settings > Location
It is very common to re-layout your warehouse facilities or storage areas such as :
- Add, delete or edit number of racks, levels or columns
- Change Properties
Add Or Delete Rack
Step 1 Launch Settings > Location
Step 2 Pick the rectangle shape named “Rack” under “Tools” sub-screen and drag it to “Drawing Canvas”. (Fig. 2)
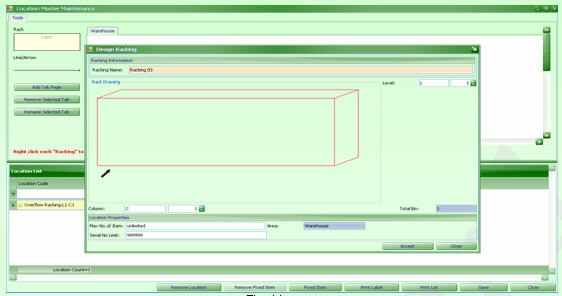
( Fig. 2 )
Step 3 Enter data to Racking Name = Racking03 , Level = 5 , Column = 10.
Configure “Max No of Item = unlimited (default)” & “Serial No Limit = 999,999”
Step 4 Clicks “Accept”. You will return to location main screen. Click “Save” At this stage, you have created additional 50 unique location codes. Check it from “Location List”.
Add Or Delete Level & Column
Step 1 If you wish to add or delete “Level” or “Column” for any rack. Just place your mouse pointer within the desired rack and right clicks. For examples, rack = Racking01.

( Fig. 3 )
Step 2 Clicks “Properties”. (Fig. 3)
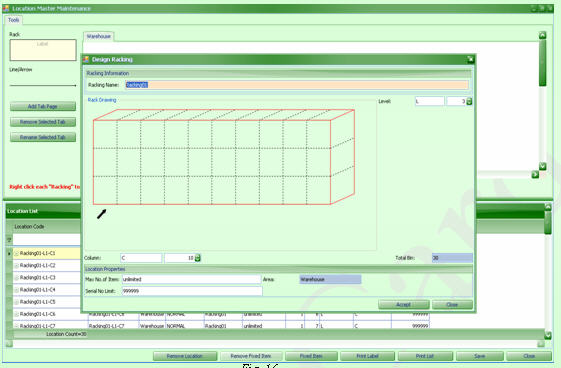
( Fig. 4)
Step 3 If you wish to add or delete the number of layers, enter desired figure at “Level”
If you wish to add or delete the number of columns, enter desired figure at “Column” (Fig. 4)
Rename Prefixes
Path: Settings > Location
Step 1 If you want to rename the “prefix” of the location codes (rack, level & column), Place your mouse pointer within the desired racking and right click.
Step 2 Click “Properties”. You can change the prefixes of “Racking Name”, “Level” & “Column”.
Change Properties
Path: Settings > Location
Step 1 If you wish to modify the storage properties (either single location or batch of location), Select Settings > Location (Fig. 5)
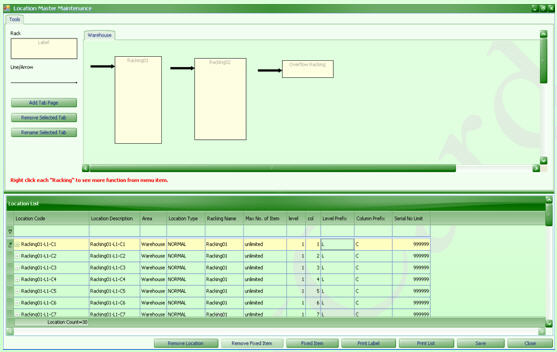
( Fig. 5 )
Step 2 Select the desired location code and proceed with amendment.
- Serial No Limit = 1
- Max No of Item = 1
Step 3 Clicks “Save”. (Fig. 6)
( Fig. 6)